Saturday, May 24, 2014

Congratulations to our graduates!

Congratulations to the Johns Hopkins University Class of 2014!

Among the many graduates who walked this year, a few have been Student Technology Services employees for years. Here we honor those who have graduated on Thursday, May 22, 2014 for their services to our mission and our community. We will miss their faces in our Production Room and their knowledge and experience that allows us to tackle complex problems. We who remain will not disappoint. Let's wish them the best of luck!

Sierra Costanza
Kyle Mercer
Jessica Noviello
Michelle Ploch
Violet Smith

#JHU2014


Tuesday, May 20, 2014

Ninite: Streamlined Installation

Right about now there are lots of people shopping for computers in anticipation of a new school year, a new job, or a new graduate. A computer is easily the most powerful tool of our age, and with all the ways to customize a machine, it is arguably one of the most versatile as well. However, there is one very annoying and very mandatory thing that everyone, from young owner to old, is subjected to. That is, of course, installing software on the computer.

There are many things to install when you first use your new computer, and many of them are easy to forget because they work automatically, such as Java, Flash, and Adobe Reader. We installed them so long ago on our old machine that the only time we ever think of them is when a pop-up announces we need an update. So it's easy to see why installing every app we've never thought of takes a large amount of time, and frustration if we discover we've forgotten one.

Happily, Patrick Swieskowski and Sascha Kuzins fixed this problem for us when they built their site, Ninite. Ninite is a free service that anyone can use without registering for anything or entering an email of any kind into any box, which is honestly very refreshing. It's a very simple interface for anyone to use: simply click on the programs that you want to install and hit the "Install" button at the bottom of the page. You may also have to get the Installer for Ninite, but it's a very quite download. Hit the run button on the executable file tab and you're ready to go. It takes a while to install everything, depending on how many you chose, so be patient and wait for it to do its job. Ninite knows instinctively which version of the software it needs to install (32 or 64 bit?), and it does it efficiently.
 
All these apps can be yours for free and all at once from Ninite!
Once the installation is complete, you'll be able to use any program it just installed. The icons for successfully installed programs will also appear on your desktop. If you want, Ninite also offers an updater tool which allows you to update all of the free software at once instead of waiting for the pop-up window to tell you it's time. This system allows for streamlined work and is a great help for a busy college student or professional alike.

While it doesn't install professional software you'd otherwise have to pay for (Microsoft Office, Adobe Creative Suite, etc.), it does provide an easy way to make sure you've gotten all of the free stuff available, and maybe even show you some you didn't know existed! Remember, if you're a Hopkins student or an alum, you can get a free copy of the Microsoft Office Suite from the Hopkins Technology Store. We did a blog article about that service here.

Ninite is a service that works on Windows and Linux systems, so Mac users are a bit out of luck (sorry guys). There are some alternatives for the Mac system though, so don't lose hope! Some good alternatives with decent interfaces are Get Mac Apps and Bodega, but I'd be shocked if Ninite wasn't working on a way to become the app installing center of the interwebs for both PC and Mac. Bodega seems to be a permanent feature to a Mac, with its own space in Launchpad and a Mac interface that is accessible at any time, but this is based on limited interactions with it.
 
Bodega is a Mac alternative to Ninite.
 This tool is hugely useful but surprisingly not well known, so the next time you get a new computer, make sure you use Ninite or one of the Mac assistants to get the most out of your computer's lifetime. Ninite rules!

Monday, April 14, 2014

Virtual JHU

Hello Hopkins! It's been a while since we talked about one of our earliest and still most successful projects: Virtual JHU. Now that the Class of 2018 decisions have been released, it's time to get the baby Blue Jays acquainted with our campus. What better way to do that than with an interactive and informative virtual campus model?

The Virtual JHU Homewood Campus! Notice that you can click the name of any building on the right hand side and the map will rotate and zoom to that location on the map. 

To view Virtual JHU, you will have to install the Google Earth plug-in, but the link is provided for you on the page. Once you get to the website main page, the plugin will take you right to where Hopkins is on Earth. The zooming in part is only a small detail of what makes this map different from the others. Alternatively, you can view the shells of buildings and their basic description via Google Earth itself. While on the Google Earth page, simply type in Johns Hopkins University, and most of the models will appear right there through Google. If you look closely at the building descriptions in the Model tab, you will see that credit for the model and information is given to JHU. They really mean JHU STS.

Using the tools on the website is intuitive for anyone who is familiar with the format of Google Maps. The zoom bar, directional compass, and observation angle are all changeable according to what the user would like to view. This makes the interface user-friendly, perfect for a potential freshmen or a parent looking at the details of campus.

Once the site has loaded (and it may take a while, apologies), you are able to move about a 3D virtual version of the Johns Hopkins Homewood Campus. Each building seen was modeled using the Google SketchUp tool by out STS team years ago. We have since used this same tool for modeling the New Clinical Building of Johns Hopkins Hospital and modeling virtual dorm rooms for the Housing and Dining Department based on the success of the first virtual JHU project.

Each building you see on the Hopkins campus comes with a short description of the building's history, who it was named for, and, if applicable, what department and equipment are housed there. An example of Mason Hall is shown below.
The history and function of Mason Hall can be found by clicking on the yellow dot that appears on the building.
You can also go inside of the buildings and explore every floor's layout. Here I have done that with the Bloomberg Center for Physics and Astronomy, the largest building on the Homewood campus.The rooms in which classes are held are marked with a purple box, and the restrooms are the green boxes. Sometimes clicking on a purple box will even tell you which class is in that room, if it's a large lecture group! The rooms will also display what equipment is available for that room in the Equipment tab.


This is a pretty neat tool whether or not you attend classes here because it allows you to explore the resources and the scale of what Hopkins has. You can learn about the campus and its history by reading through the descriptions, and also look inside of the dorm buildings and scope out a potential new home.

As of now, Virtual JHU is getting ready for a renovation that will include new buildings like Brody Learning Commons and renamed old ones like Croft Hall. This will happen within the coming year thanks to the dedication of STS employees. Keep your eyes out for more announcements!

Tuesday, March 25, 2014

Charles Street Reconstruction

Welcome back, Hopkins! It's snowing here again in Baltimore, but (hopefully) spring is on its way and will arrive sooner rather than later. Then the construction that has disrupted traffic down North Charles Street can begin again!

The extremely wet winter has completely obliterated the already tight schedule that the city of Baltimore imposed on the North Charles Street Reconstruction Project. It is a $28 million undertaking that will renovate and beautify the Charles Street area around the Johns Hopkins campus, making it safer for bicyclists and pedestrians. Johns Hopkins University has a financial interest in the successful completion of this project, having donated part of the $28 million, but it certainly will not be done before the start of the 2014 fall semester.

Johns Hopkins Information Technology Department (IT@JH) has had a large, albeit quiet, role in the renovation project. As you can imagine, there are hundreds of miles of wires, cables, and conduits running underneath the tar on Charles Street. In order to proceed with construction, every single one of those cables had to be inspected. Some communications cables were 40 years old, but replacing them could also mean a lack of service. So how do you replace a system without removing it?

The answer is you relocate them, and the daunting task was assigned to the Homewood Networking Team. Their team worked closely with JHU Facilities to assemble an expert team to take stock of the extensive wire system and copper assets located below the street. In an effort to avoid such issues the next time construction is imminent, the team also designed and built two 8-way conduits to streamline communications wires and cables. Now that the Northern part of the project has basically concluded, the Southern half will be a relatively simple redundancy.

The amount of work that this team put into this project is astounding, but what makes it truly exceptional is the fact that there was virtually no downtime among any of the affected systems. In total 500 fiber connections were relocated. Most of the changes were made during the early morning hours, when demand on the systems was minimal, which speaks to a special level of dedication in itself.

From all of the members of the Hopkins community, we say a sincere thank you to the members of these task forces, who performed to the highest standards of ingenuity. For all those seeking more information regarding the overall Charles Street project, visit this site: http://www.charlesstreetreconstruction.com/

We all hope to see the construction completed soon, but first we shall wait for spring. Happy first week back!

Tuesday, March 11, 2014

The Gaming World of Steam

For some people playing video games is a great stress release. You may even say it could help them let off...Steam (pun certainly intended).

The Steam logo
This kind of Steam is not the kind that rises out of a pot of boiling water; it is a vast game distribution and communications platform for people who play video games on their computers. It is estimated to  account for 50-70% of all online game sales, an industry that is about $4 billion big, and support 7.5 million concurrent users as of February 2014. This is ten times as large as the 75 million active users (those with an account) that Valve reported in January 2014. This monster is huge and it's getting bigger.

Some games that a free to play and available once Steam has been installed
The major company behind the Steam platform is Valve Corporation. The platform allows users to download games, save information on a cloud, chat with other players in game space, and keep friends lists. Steam is constantly changing to fit its evolving clientele, a must for any technological company. Until May 2010, Steam users had to have the Windows OS, meaning players on Macs and Linux systems were nonexistent. Steam not only fixed this issue, but made its cloud platform-independent and cross-compatible (Mac people could play against PC people, etc.). It reached out to make some games available on the PlayStation 3 console, and it is currently working on its own video game console project, called the Steam Machine. It even allows iOS and Android users to use Steam on their mobile phones. It's incredible.

Pretty much the most awesome computer game of all time.
One of their most popular games is the FPS game Portal, which features the new portal gun weapon, designed to allow the character to move throughout an obstacle course by shooting start and finish wormholes around the obstacles. It's an addicting game that only takes about an hour to play, but it's wonderful to test problem solving skills and strategy. Its sequel, Portal 2, even has a multiplayer mode and is one of the few available on PS3. Some other games they have distributed include the popular HalfLife 2 series, Crysis 2, and Left 4 Dead 2, and Team Fortress 2.

I know from personal experience that the games Steam offers are some of the most challenging I've ever played. I like that most are suited for a single player, and even if they aren't, the online community is large enough to supplement a single player with a full field of opponents. Most games are available on Steam for cheaper than they would be in a store. One thing that Steam is famous for doing is giving 70% of the profits to the game designers and developers, instead of the 30% they get from retail sales. This has led to some calling Steam an "effective monopoly," but no more has been said about it since then.

Installing Steam is very simple. At the top of the store's home page, there is a green button that says "Install Steam." The system will have to be told which version to download according to your OS, but everything beyond that is pretty much standard installation stuff.

Then all you have to do is make a Steam account, log in, and start playing.

Warning: these games are extremely addictive. Play only over school breaks so you don't fall behind on work.

Good luck!

Tuesday, February 18, 2014

Pros and Cons of Commonly Used Internet Browsers


These days there are many popular browsers to choose from: Chrome, Firefox, Safari, and Internet Explorer to name a few. Most people are running Chrome or Firefox, but there are advantages and disadvantages to each one. Here's the breakdown:

Chrome:
Currently the most widely used browser, Chrome boasts fast boot-up and loading times, a massive extensions marketplace, and an easy-to-use interface. You can also go "Incognito" if you don't want to save search history or cookies. Chrome also integrates your preferences over every device on which you use Chrome, even if it's a public computer. Simply log into your Google account and all of your bookmarks, preferences, and recent history is returned to the computer.The Chrome store is also occasionally interesting (it's very small though), and the Chromebooks are a nice addition to the Chrome family.

However, Chrome isn't all cupcakes and rainbows; Chrome achieves its fast boot-up times by starting up in the background as soon as your computer turns on, though you can change this on Windows using MSConfig or Autoruns. The loading times are most likely made possible by the large memory requirements Chrome places on your computer. To see what I mean, you can open up Task Manager (Ctrl + Alt + Del on Windows 7, or from Terminal in Mac) and go to the Processes tab. Here's mine for example. 5 of the 6 most memory-consuming processes were all Chrome-related, and I only had 2 tabs open with minimal extensions. Plus, some sites (Hopkins sites, banking sites, etc.) have an issue with working on Chrome, and some of those issues stem from the fact that it is a 32-bit browser, unlike Firefox or Safari, which are 64-bit. At the point when this happens, I just switch to using another browser.

Further, Incognito mode doesn't actually do much to protect your privacy. Google's own page states that it won't affect "Websites that collect or share information about you, ... malicious software ... [or] secret agents". And because Chrome is proprietary (not open-source), it is always possible that the browser has some hidden behaviors to collect your information. Thanks to Edward Snowden, Google's quip about secret agents just doesn't seem funny anymore.

Oh, and that new scroll bar is awful.

Firefox: Unlike Chrome, Firefox by Mozilla is entirely open-source. Like Chrome, Firefox can be set up so that you can use your settings from any device (Using Sync), but if privacy is a concern, you don't have to. One of my favorite features on Firefox is the "Master Password". Like Chrome, Firefox will ask you if you want to save a password for a site. Without Sync, Mozilla doesn't need to know your passwords; they can be stored safely on your computer. And with Master Password, you can make wildly complex passwords for all your online accounts, and only have to remember one. That being said, your Master Password should still be fairly secure in case your computer falls into the wrong hands.

I also prefer how Firefox displays their privacy options. Here is Chrome and Firefox side-by-side:
Chrome's privacy setting are actually much longer than what is shown, and all the powerful options are hidden in a non-descript button called "Content settings". Plus, there's no description as to what the settings mean. What are handlers? Which plug-ins are running without my knowledge? While Firefox may not have as many options as Chrome, Firefox is much more verbose with the options it does have.

Firefox is noticeably slower than Chrome, but also places less memory requirements (For me, only one process, and it requires about a third of the memory that Chrome collectively asks for.) Bottom line: Firefox is more trustworthy than Chrome and has more understandable options, at the cost of some speed and overall performance.

Internet Explorer: If you're running Windows, Internet Explorer comes natively on your computer, making it the ideal web browser for downloading a better web browser. As far as other real advantages, there really aren't any. It's as slow (if not slower) than Firefox, and doesn't really have any features that stick out. Its Settings page is bloated to the point that it is difficult to find the settings you want to change, the horizontal scrollbar can be unresponsive for touchpads. If you're using IE to view this blog, do yourself a favor and switch to Chrome or Firefox right now.

Safari: Safari is the Internet Explorer for Macs; it's the native web browser and comes installed on the OS without any work on your end. Unlike Internet Explorer, however, Safari is actually a decent browser (though Firefox is still #1 in my book). The current edition available for Macs is Safari 7, and there is a Windows Safari application also available (5.7.1). Because of the large population of iPhone users, Safari accounted for 62.17 percent of mobile web browsing traffic, but only 5.43 percent of desktop traffic in October 2011. Curious.

The privacy settings on Safari are also pretty impressive, with third party and cookie blocking, options that will tell websites not to track you, and Private Browsing, which is more comprehensive that Chrome's Incognito mode. Safari is also very power efficient on Macs, designed to help your battery last for 1 hour longer than it would if you were using Chrome or Firefox. Both Firefox and Chrome also use about a third more memory (133%) on your hard drive than Safari will (again, on a Mac). According to the Apple page, Safari is also 6x faster than Firefox. The Safari extensions act like the Chrome additions, allowing users to choose weather apps, Facebook enhancers, and things that will help with code debugging.

Safari promises to do all this on Macs, and I know from experience on my home PC that Safari is not even close to these stats on a PC. You are much better off with Firefox or Chrome on a PC, no question. Despite all the advantages, Safari is still far behind Firefox and Chrome, even on Macs. I like how Chrome can integrate over all my computers and Chromebook, but Safari has nothing like that. It certainly helps make a decision.

We hope that this post has helped you if you ever had questions about web browsers. Thanks for reading!

Tuesday, February 11, 2014

Online Collaboration

As we mentioned before in Our Heads are in the Clouds, cloud storage allows multiple users to collaborate on the same projects. In this article we will discuss how to use Google Drive and JShare to gain control over the changes your fellow collaborators make to shared documents.

Using Google Drive is as simple as clicking the red "Create" button on the left sidebar, selecting the type of Google Doc, making your first edits, and clicking the blue "Share" button in the top-right of the Doc page.


When you click on "Share", a "Share Settings" dialog box opens with various options. At the bottom you can explicitly add Google users as collaborators (and individually assign permissions), but you can also change the access settings (under "Who has access") to "Anyone with the link" and then send the link to your collaborators. The second method gives all Anonymous users the same permissions to your doc, however, so I recommend giving them "Can View" access only.


With multiple users editing the same document, you may find that you need to access a previous version, before someone else changed your content. Docs allows you to do this with "See Revision History" under the File tab. If you don't see a specific change, try clicking the "Show more detailed revisions" button at the bottom. You'll notice that user edits are color-coded. Once you find the latest version with the content you want, you can click "Restore this revision" to roll back all changes after that point. Those changes are still stored in the revision history, however, in case you want to access them later.


One major drawback of Google Docs' revision system is that there is no way to 'merge branches'; that is, to combine non-conflicting content in two different versions of the same document, in order to create one new version. In addition, adding multiple users with varying levels of access isn't very user-friendly. However, if you are working with only a few people on a couple pages of work, Google Drive + Docs is the fastest and easiest tool for the job.

JShare has an uglier interface and is a bit more complicated than Google Docs, but JShare also gives you more powerful tools if you're willing to learn how to use them. Here we will give an example of JShare's usage with blog articles. First create a new folder to hold the blog articles you want others to edit:


That button will start the Folder wizard, which first asks for for a folder name. I wrote "Blog Articles" and then pressed the Next button. Then you must select the other users that are allowed access to the folder (we'll specify their permissions later). Simply start typing their email in the text box and select the right one from the drop-down list. When you have added all your users, click Next. You should now be at the "Verify Permissions" step. For each user, click the permissions you want to give them. For this application, I will be giving my only user "Contributor" access.


After clicking next again, you will be at the "Configure" step. Since we want versioning, check the first box. The other options aren't useful to me right now, but they can be helpful if you have sensitive documents or are working on a long-term project.


Finally, you can send an Email to each of your users (who have at least read-access) with a link to the folder you have just created.
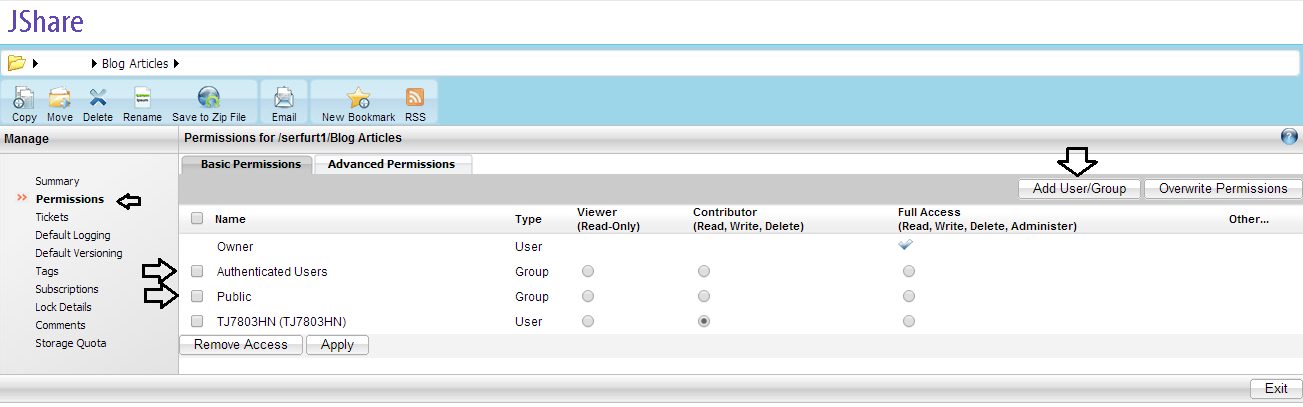
This requires that your native mail client (Apple Mail for Macs and Microsoft Outlook for PCs) is set up properly. This step isn't necessary if you are sending the link to users personally via other methods. Once you are done, you should see your new folder in your home directory. If you ever want to change the permissions given to users, right-click the folder, and then select "Manage" from the drop-down menu. If you remember from the other article on JShare, the Permissions tab on the left sidebar takes you to this screen:


You'll notice that in addition to the user I added, we can also change the permissions given to Authenticated Users (Users who passed through the Hopkins Portal), as well as for the Public (Anonymous users). You can also add new users and give them their own permissions by clicking the "Add User/Group" Button. Don't forget to click "Apply" to save your changes. Note that you may have to change the permissions for files within the folder.

Once you have some content in your folder that has been overwritten, you can start accessing previous versions of them by selecting the file you want to revert, going to Manage/Versioning/ as before, and clicking on the Version Number. This will open a dialog box where you can choose where to save the version so you can edit it locally. Be sure to name the file after its original name (JShare does not do this automatically).


It's also a good idea to check out the file any time you are working on it. This prevents anyone else from editing the file until you check it in again. If you don't check out the file, someone could try editing it while you are working on it, only to have your version overwrite all their (potentially helpful) changes when you upload it. The button "Checkout File" is located near the top of the Versioning window.

When you are ready to check in your files again, upload your version to where the previous version is located on JShare (Using the "Upload" button in the blue "Files" menu), and be sure to click "Overwrite file if it already exists" before beginning the upload. Then right-click the file in JShare and select "Checkin" from the drop-down menu. Now any other contributor is free to check out the file and make their own changes.


As you can see, JShare is a bit more difficult to work with than Google Drive. However, for projects where changes are made in large packets, or where permissions and version control need to be explicitly stated, JShare is the better tool to use.

If you want to learn more about version control systems that include merging and other helpful development tools, keep an eye out for an upcoming article on using Git and SourceTree. That's all for now, thanks for reading!